Block ads and malware sites by using hosts file on router
I browse the web using multiple devices and adding ad-blocker or ad blocking host files to all the devices is a boring thing to do and sometimes it is not possible without jail breaking the device.
I have an old wireless router (TP-Link TL-WR740N v4) and I am using it to test out DD-WRT's ability to use a custom host file on it.
You can check this database to find out if your router is supported.

My router is supported!
Stable releases were last updated in 2008. I will be using beta firmware. I have selected a firmware version which is known to work without issues on my router (thanks to testing and suggestions from the community)

factory-to-ddwrt.bin is compatible with the router.
Backup TP-Link router's current configurations from http://192.168.0.1 (log in as admin/admin if you are using default credentials) > System Tools > Backup & Restore.
To install the new firmware, go to System Tools > Firmware Upgrade
Select the file downloaded and click on Upgrade.


The control panel of DD-WRT is accessible from http://192.168.1.1
The default password is admin/admin. You will be prompted to change the default user name and password.

Set SSID and wireless access security


You will have to reconnect to the new SSID after applying the new settings.
Maintain your internet connection user ID and password from Setup > Basic Setup > WAN Setup

We need the internet connection to download hosts file from someonewhocares.org
Go to Services > Services and scroll down to Secure Shell section.
Enable SSHd and set a port. I am using the default SSH port 22.

Apply settings.
Now you can log on to the router using the following settings and root user (admin is the default password)


Maintain "addn-hosts=/tmp/sowchosts" as Additional DNSMasq Options under Services > Services > DNSMasq

This setting tells the router to use an additional hosts file at a specific location.
From the PuTTY connection, run the following command:
wget -qO /tmp/sowchosts http://someonewhocares.org/hosts/zero/hosts && stopservice dnsmasq && startservice dnsmasq

This command downloads the hosts file and places it on the desired location. If the download is successful, it will stop and start the dnsmasq service.
Set the following cron job by maintaining "0 1 * * * root wget -qO /tmp/sowchosts http://someonewhocares.org/hosts/zero/hosts && stopservice dnsmasq && startservice dnsmasq" under Administration > Management > Cron.

The router I am using doesn't allow me to operate anywhere other than /tmp folder. But the contents of /tmp are removed (and defaults are recreated) after a router restart.
With the cron job, I'll be re-downloading the hosts file which gets lost on router restart. Plus the hosts file on someonewhocares.org is updated regularly, so I get to have the updated one on the router.
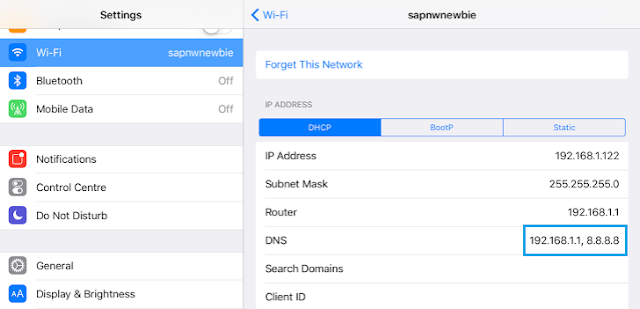
Make sure the DNS settings on the devices first use 192.168.1.1 (router) and then other DNS servers (8.8.8.8 for example)
There are a lot more powerful features that I can test and use to my benefit. Getting rid of pop-ups was my priority as iOS devices did not have good options to prevent the endless pop-ups and pop-unders.
I have an old wireless router (TP-Link TL-WR740N v4) and I am using it to test out DD-WRT's ability to use a custom host file on it.
What is DD-WRT?
DD-WRT is a third-party firmware that works for a huge number of wireless routers from a variety of manufacturers. The community of DD-WRT users have created a great list of resources, which makes it easy to understand and use.You can check this database to find out if your router is supported.
My router is supported!
Download and Install the Firmware
The next step would be to download the firmware suitable to your router. The downloads can be made from ftp.dd-wrt.comStable releases were last updated in 2008. I will be using beta firmware. I have selected a firmware version which is known to work without issues on my router (thanks to testing and suggestions from the community)
factory-to-ddwrt.bin is compatible with the router.
Backup TP-Link router's current configurations from http://192.168.0.1 (log in as admin/admin if you are using default credentials) > System Tools > Backup & Restore.
To install the new firmware, go to System Tools > Firmware Upgrade
Select the file downloaded and click on Upgrade.
Log in to DD-WRT Control Panel
The SSID will be dd-wrt. Connect you computer to the new SSID.The control panel of DD-WRT is accessible from http://192.168.1.1
The default password is admin/admin. You will be prompted to change the default user name and password.
Set SSID and wireless access security
You will have to reconnect to the new SSID after applying the new settings.
Maintain your internet connection user ID and password from Setup > Basic Setup > WAN Setup
We need the internet connection to download hosts file from someonewhocares.org
Enable SSH
We will log on to the router using PuTTY. Before we can do that, we will need SSH services running on the router.Go to Services > Services and scroll down to Secure Shell section.
Enable SSHd and set a port. I am using the default SSH port 22.
Apply settings.
Now you can log on to the router using the following settings and root user (admin is the default password)
Use ad-blocking hosts file
We will store the hosts file as /tmp/sowchosts and use the 0 hosts files from someonewhocares.org. There are a lot of websites that maintain ad-blocking hosts files. I find this one easy to remember and use.Maintain "addn-hosts=/tmp/sowchosts" as Additional DNSMasq Options under Services > Services > DNSMasq
This setting tells the router to use an additional hosts file at a specific location.
From the PuTTY connection, run the following command:
wget -qO /tmp/sowchosts http://someonewhocares.org/hosts/zero/hosts && stopservice dnsmasq && startservice dnsmasq
This command downloads the hosts file and places it on the desired location. If the download is successful, it will stop and start the dnsmasq service.
Set the following cron job by maintaining "0 1 * * * root wget -qO /tmp/sowchosts http://someonewhocares.org/hosts/zero/hosts && stopservice dnsmasq && startservice dnsmasq" under Administration > Management > Cron.
The router I am using doesn't allow me to operate anywhere other than /tmp folder. But the contents of /tmp are removed (and defaults are recreated) after a router restart.
With the cron job, I'll be re-downloading the hosts file which gets lost on router restart. Plus the hosts file on someonewhocares.org is updated regularly, so I get to have the updated one on the router.
Make sure the DNS settings on the devices first use 192.168.1.1 (router) and then other DNS servers (8.8.8.8 for example)
There are a lot more powerful features that I can test and use to my benefit. Getting rid of pop-ups was my priority as iOS devices did not have good options to prevent the endless pop-ups and pop-unders.


Comments
Post a Comment